We wanted to do more than just write a quote; we wanted to make a shirt that support our team. We decided to make shirts that would be cute attire for when we went down to Charlotte to watch the Checkers play.
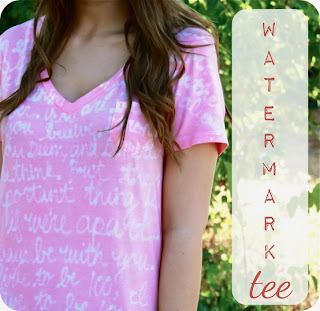
Checkers Watermark Tee
Supplies:
- White or other Light Colored T-Shirt- $3 (these are easily found at most craft stores)
- Elmer's Blue Gel Glue (We used the traditional white Elmer's Glue because we couldn't find the Blue School Glue- it worked better than expected) -
- Fabric Dye (Rit is the best dye to use) - price varies based on if you use the liquid dye or the powder, we used the powder for $3-4
- Bucket or Container to mix dye in (we used a $3 bucket from Walmart)
- Newspaper & Sarah Wrap for the drying process
Step 1: Prepare the Shirt
We're already admitting our faults- we skipped this step. The original instructions from U Create Crafts said to "Wet your tee with cool water and place a water resistant board between the layers of fabric. I used the lid of a bin." We thought it would be messy and honestly we don't think it made that much difference to the final product. Your choice though- if you have the space to soak the shirt and then write on it, go ahead.
Step 2: Decide on your Design

We first mapped out our design on pencil and paper before writing it out on the shirt. If you wanted a really professional looking shirt, you could print a design and slip it under the shirt to copy (the benefit of using a white shirt to do this). We mostly used the paper to get the spacing we wanted before copying it over.
Personal Tip: As shown by the picture, we recommend having a supply of gummy worms and HBO's 24/7 Winter Classic episodes to get you through the design process.
Step 3: Add your Design

Adding the design is probably the most time consuming part of this whole process because you have to let the glue dry completely before you put it in the dye. This will probably take at least 2-3 hours.
Pro tip: If you don't have a lot of time, hair dryers do an excellent job at speeding up the drying process (L is pretty sure she uses her hair dryer more for crafting than actual hair drying). We did this entire project (up until the washing stage- the easy part) in under 3 hours thanks to the hair dryer.
For a 2 sided tee- Wait until the glue is completely dry, then flip the shirt over and design the back. Sounds simple, but it takes a lot of dedication to wait for it to dry and then re-prepare the shirt to do a backside.
Step 4: Dye!

Follow the instructions on the package to prepare the dye. All the instructions vary per brand, but it's typically just make sure all the solute (dye) is dissolved in the solvent (water) (Hey there chemistry terms- Didn't think I'd use you after college!). Leave the shirt in the solution until it's the shade that you want; we recommend leaving it in for even longer because A LOT of the color will come out when you wash it.
Don't Tye Die: We made that mistake and take it from us, it didn't turn out well. This project works best when you just put the shirts in the dye mixture. We rolled ours up to get a cute design too, but as the glue gets damp (because it is washable glue), it leaves marks on other parts of the shirt. This is really apparent on L's shirt below.
Multicolor: Multicolor shirts are possible, just be really careful when you do it. Instead of making one package of dye, you can make several in multiple buckets or containers with different colors of dye. After preparing the different solutions, be careful to only put the parts of the shirts you want to be dyed (as the glue starts to wash out, the lettering may become those colors if you aren't careful).
Step 5: Lay It Out to Dry

This step is important- you've got to let the dye and the shirt dry. When you tie dye, they typically have you stuff the shirt in a bag and then keep it in there for 24-48 hours. This project had you lay it out flat to preserve the design, but you still need to give it adequate time to dry so the dye can set.
Pro Tip: In the picture it looks like we've just laid the shirt on some newspaper on the kitchen counter, but there's a layer of Saran Wrap under it. Please don't be that person that dyes their kitchen counter red because you attempted this project.
Step 6: Wash!
After the shirt dries completely (we waited until the next afternoon, so about 18 hours of drying time), wash it for about 15 minutes in cool, soapy water. This step is when you get most of the glue out and you remove any of the excess dye. We ended up running the shirt under water until we could no longer get any more of the dye out.
Once you complete this step, you're done! You're free to wash the shirt in the washing machine (we washed them together first, just in case) and dry as you normally would a T-shirt!
Step 7: Enjoy!
This is what L's final shirt design looked like; you can see the patterns in it from folding it up during the dyeing process and the red/black shades from the tie dye. Still turned out looking pretty good though (well, good enough for one hockey game and a bunch of gym visits since)!
Front

Back

L put the date of the game we were going to and the number of every guy that was going to be playing. We photo blogged about our trip to Charlotte on our other blog (click here to check out the post). Looking back, adding these details were a great way to remember the game.
Peace, Love, & Hockey,
L&N